Metaphase Marketing

Google Ads, Salesforce, Offline Conversions, Lead Generation, CRM Integration

Salesforce + Google Ads Offline Conversion Tracking: Full Technical Setup

Salesforce is the most capable CRM in the market for tracking the full B2B revenue journey. It handles complex pipelines, multi-stakeholder deals, enterprise opportunity stages, and attribution across long sales cycles with precision that lighter CRMs cannot match.

And yet, most Salesforce users running Google Ads have almost no attribution visibility. The Salesforce data and the Google Ads data sit in completely separate silos. The ad platform has no idea which campaigns drive real opportunities or closed revenue. It optimizes for form fills instead.

The technical work to close that gap is not especially complex , but it requires a specific setup that most accounts have not done. You need a custom GCLID field on both the Lead and Opportunity objects, a mechanism to capture the GCLID on your website and pass it through your web form, a way to copy it from Lead to Opportunity on conversion, and either Google's native Salesforce integration or an API-based pipeline to import conversions automatically.

This guide walks through every step of that setup.

Salesforce to Google Ads GCLID pipeline showing six steps from ad click through Web-to-Lead to automated conversion import via Data Manager or API

Key Takeaways

  • Connecting Salesforce to Google Ads requires creating a custom GCLID__c field on both the Lead and Opportunity objects and capturing the GCLID on your website at landing time.

  • Google's Data Manager provides a native Salesforce integration that maps Opportunity stages to Google Ads conversion actions and syncs automatically every 6 hours , no custom API work required.

  • For higher-volume or more complex setups, the Google Ads API gives you real-time imports, dynamic conversion values, and full control over the upload pipeline.

  • Field History Tracking on Opportunity Stage is required for Google's native integration to detect stage changes and trigger imports.

  • Always set the attribution window to match your actual sales cycle. A 90-day window is the standard, but enterprise accounts with longer deal cycles should plan for this limitation.

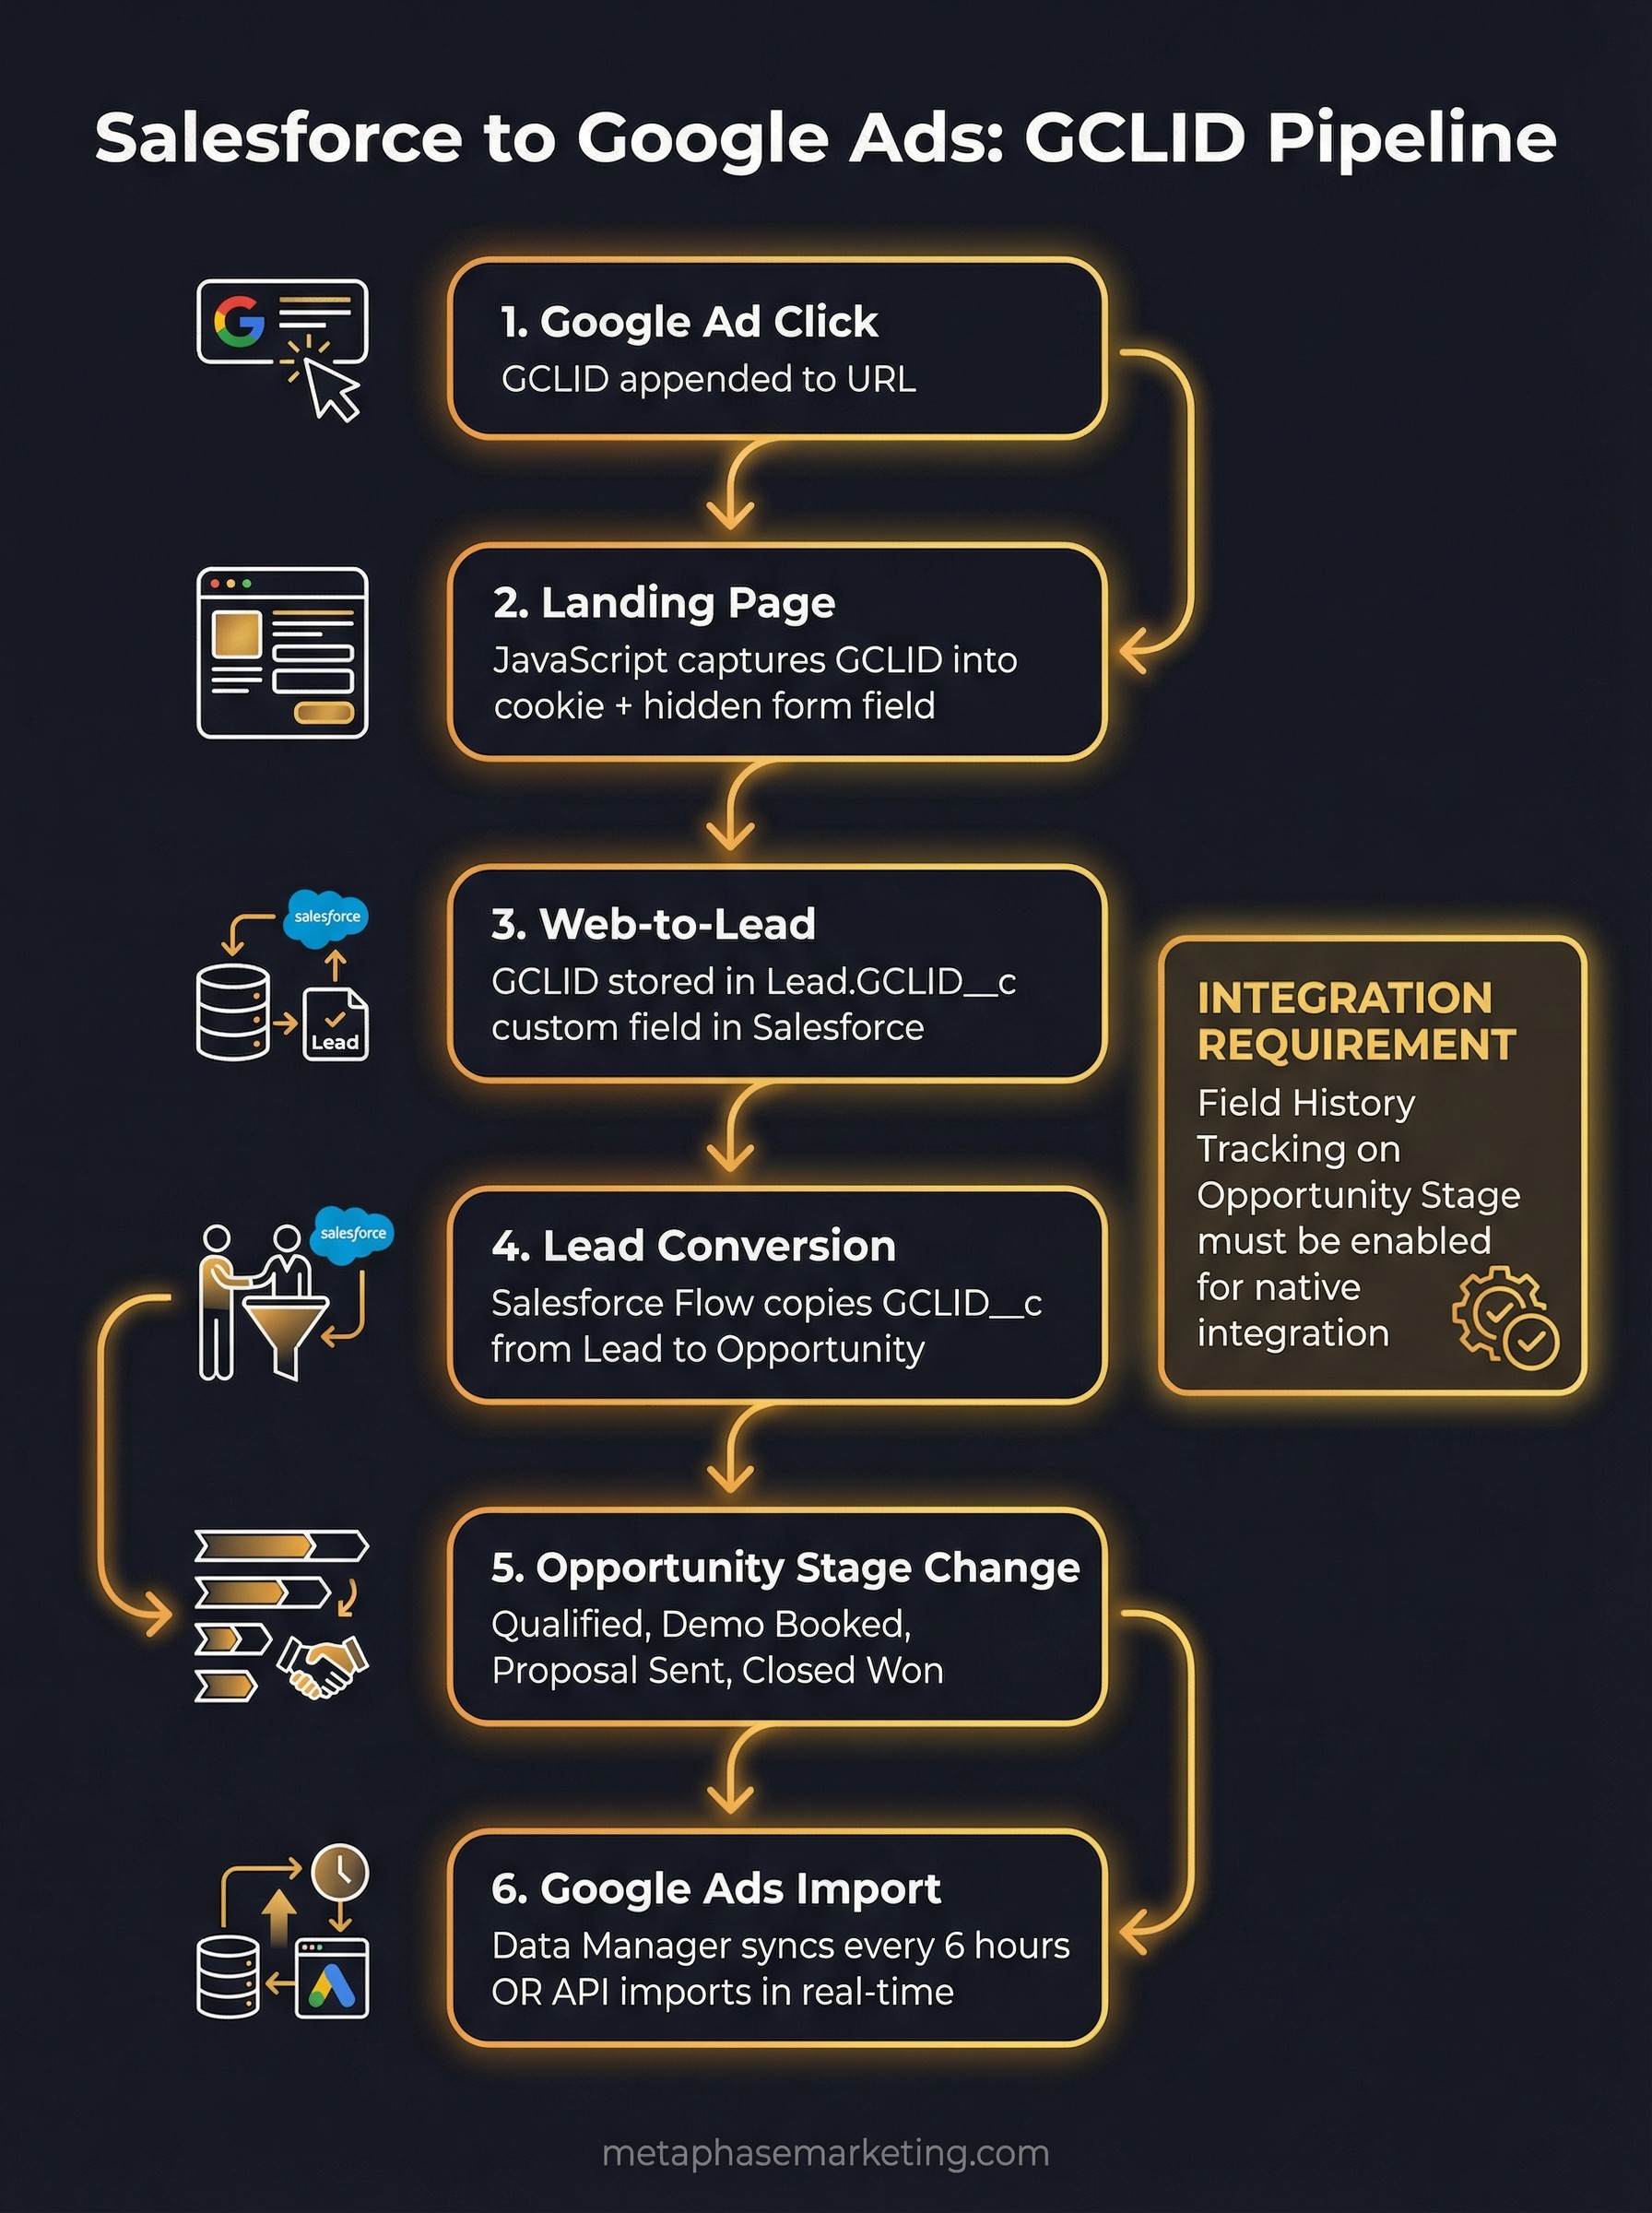
The GCLID → Lead → Opportunity → Google Ads Pipeline

Before any code, here is the full data flow you are building:

  1. Someone clicks your Google Ad. A GCLID is appended to your landing page URL.

  2. JavaScript on your landing page captures the GCLID and stores it in a cookie and a hidden form field.

  3. The prospect submits your web form. Your server creates a Salesforce Lead and stores the GCLID in the custom GCLID__c field.

  4. The Lead is qualified and converted to a Contact and Opportunity. Your automation copies the GCLID from the Lead to the Opportunity's GCLID__c field.

  5. The Opportunity moves through your pipeline stages. When it reaches a qualifying stage (Qualified, Demo Scheduled, Closed Won), Google Ads receives a conversion import tied to the original GCLID.

  6. Smart Bidding now knows which keywords, audiences, and campaigns produce real pipeline and revenue.

Step 1: Enable Auto-Tagging in Google Ads

Auto-tagging must be enabled for GCLIDs to appear in your ad destination URLs. Go to Google Ads → Settings → Account Settings and verify that the "Auto-tagging" option is checked. If not, enable it. Every ad click from this point forward will include a ?gclid=XXXX parameter.

Step 2: Create the GCLID Field on the Lead Object

In Salesforce, create a custom text field on the Lead object to store the GCLID:

  1. Go to Setup → Object Manager → Lead → Fields & Relationships → New.

  2. Select Field Type: Text.

  3. Field Label: Google Click ID (or anything descriptive).

  4. Field Name (internal API name): GCLID , Salesforce will store this as GCLID__c.

  5. Length: 255 characters. GCLIDs can be long , do not set this shorter.

  6. Save.

Note the exact API field name (GCLID__c) , you will need it when configuring your Web-to-Lead form and any API integrations.

Step 3: Create the GCLID Field on the Opportunity Object

Repeat the same process for the Opportunity object:

  1. Go to Setup → Object Manager → Opportunity → Fields & Relationships → New.

  2. Select Field Type: Text, Length: 255.

  3. Field Label: Google Click ID.

  4. Field Name: GCLID (stored as GCLID__c).

  5. Save.

Google's native integration reads from the Opportunity object when matching conversions to stages. The field must exist and be populated on Opportunity for the sync to work.

Step 4: Capture the GCLID on Your Website

Install this JavaScript on every landing page. It captures the GCLID from the URL at arrival time and stores it in a cookie:

function getUrlParameter(name) {
  name = name.replace(/[\[]/, '\\[').replace(/[\]]/, '\\]');
  const regex = new RegExp('[\\?&]' + name + '=([^&#]*)');
  const results = regex.exec(location.search);
  return results === null ? '' : decodeURIComponent(results[1].replace(/\+/g, ' '));
}

function storeGclid() {
  const gclid = getUrlParameter('gclid');
  if (gclid) {
    const expiryDate = new Date();
    expiryDate.setDate(expiryDate.getDate() + 90);  // 90-day expiry
    document.cookie = `gclid=${gclid}; expires=${expiryDate.toUTCString()}; path=/; SameSite=Lax`;
    document.cookie = `gclid_timestamp=${Date.now()}; expires=${expiryDate.toUTCString()}; path=/; SameSite=Lax`;
  }
}

storeGclid();

Add a hidden field to your web forms that pulls from the cookie at submission time:

<form id="lead-form" action="/submit" method="POST">
  <input type="text" name="first_name" placeholder="First Name">
  <input type="email" name="email" placeholder="Email">
  <input type="tel" name="phone" placeholder="Phone">

  <!-- Hidden field for GCLID -->
  <input type="hidden" name="gclid" id="gclid_field">

  <button type="submit">Request a Consultation</button>
</form>

<script>
  function getCookie(name) {
    const value = `; ${document.cookie}`;
    const parts = value.split(`; ${name}=`);
    if (parts.length === 2) return parts.pop().split(';').shift();
    return '';
  }
  document.getElementById('gclid_field').value = getCookie('gclid') || '';
</script>

Step 5: Pass the GCLID into Salesforce via Web-to-Lead

If you use Salesforce's Web-to-Lead feature, you can add the GCLID__c field directly to the generated form HTML. In your Web-to-Lead form code, include the field as a hidden input:

<input type="hidden" name="GCLID__c" id="gclid_sf_field">

Populate it from the cookie using the same JavaScript pattern above. When the form submits to Salesforce's Web-to-Lead endpoint, the GCLID will be stored on the newly created Lead record automatically.

If you are using a custom integration (via Salesforce REST API or a middleware like Zapier), include the GCLID__c field value in your Lead creation payload:

def create_salesforce_lead(form_data: dict, sf_client):
    lead_payload = {
        "FirstName": form_data.get("first_name"),
        "LastName": form_data.get("last_name"),
        "Email": form_data.get("email"),
        "Phone": form_data.get("phone"),
        "Company": form_data.get("company", "Unknown"),
        "GCLID__c": form_data.get("gclid", ""),  # pass the GCLID
        "LeadSource": "Web"
    }
    result = sf_client.Lead.create(lead_payload)
    return result["id"]
Salesforce stage to Google Ads conversion mapping table showing Qualified, Demo Scheduled, Proposal Sent, and Closed Won with values and attribution windows

Step 6: Enable Field History Tracking on Opportunity Stage

Google's native Salesforce integration detects when an Opportunity stage changes by reading Salesforce Field History. This must be enabled explicitly:

  1. Go to Setup → Object Manager → Opportunity → Fields & Relationships → StageName.

  2. Click Set Field-Level Security and ensure the field is visible.

  3. Return to Opportunity → Fields & Relationships and click Set History Tracking.

  4. Enable tracking for the Stage field.

  5. Save.

Without this, the native integration cannot detect when an Opportunity moves from "Proposal" to "Closed Won" and cannot trigger the conversion import.

Step 7: Copy the GCLID from Lead to Opportunity

When a Lead is converted in Salesforce, it creates a Contact and an Opportunity. By default, custom fields on the Lead do not carry over to the Opportunity. You need to set this up explicitly.

Option A: Salesforce Flow (no code)

  1. Go to Setup → Flows → New Flow → Record-Triggered Flow.

  2. Trigger: When a record is created or updated.

  3. Object: Opportunity.

  4. Condition: GCLID__c is null AND ConvertedLeadId is not null (or use the related Lead lookup).

  5. Add an action to query the related Lead and copy GCLID__c to the Opportunity's GCLID__c.

  6. Activate the Flow.

Option B: Apex Trigger (for complex mappings)

trigger OpportunityGCLID on Opportunity (before insert) {
    Set<Id> convertedLeadIds = new Set<Id>();
    for (Opportunity opp : Trigger.new) {
        if (opp.GCLID__c == null) {
            // Will populate from lead if available
        }
    }

    // Query Leads that were recently converted and have GCLIDs
    List<Lead> leads = [
        SELECT Id, ConvertedOpportunityId, GCLID__c
        FROM Lead
        WHERE ConvertedOpportunityId IN :Trigger.newMap.keySet()
        AND GCLID__c != null
    ];

    Map<Id, String> oppToGclid = new Map<Id, String>();
    for (Lead l : leads) {
        oppToGclid.put(l.ConvertedOpportunityId, l.GCLID__c);
    }

    for (Opportunity opp : Trigger.new) {
        if (oppToGclid.containsKey(opp.Id)) {
            opp.GCLID__c = oppToGclid.get(opp.Id);
        }
    }
}

Step 8: Connect Salesforce to Google Ads via Data Manager

Google's Data Manager provides a native Salesforce integration that handles the conversion import automatically:

  1. In Google Ads, go to Tools → Data Manager.

  2. Click Connect data source → Salesforce.

  3. Authenticate via OAuth with a Salesforce user that has access to the Opportunity and Lead objects.

  4. Google will scan your Salesforce objects and display available fields.

  5. Map the GCLID__c field as the click identifier.

  6. Configure which Opportunity stages should trigger conversion imports.

Once connected, Google syncs every 6 hours. Conversion imports happen automatically when Opportunities move through the stages you defined.

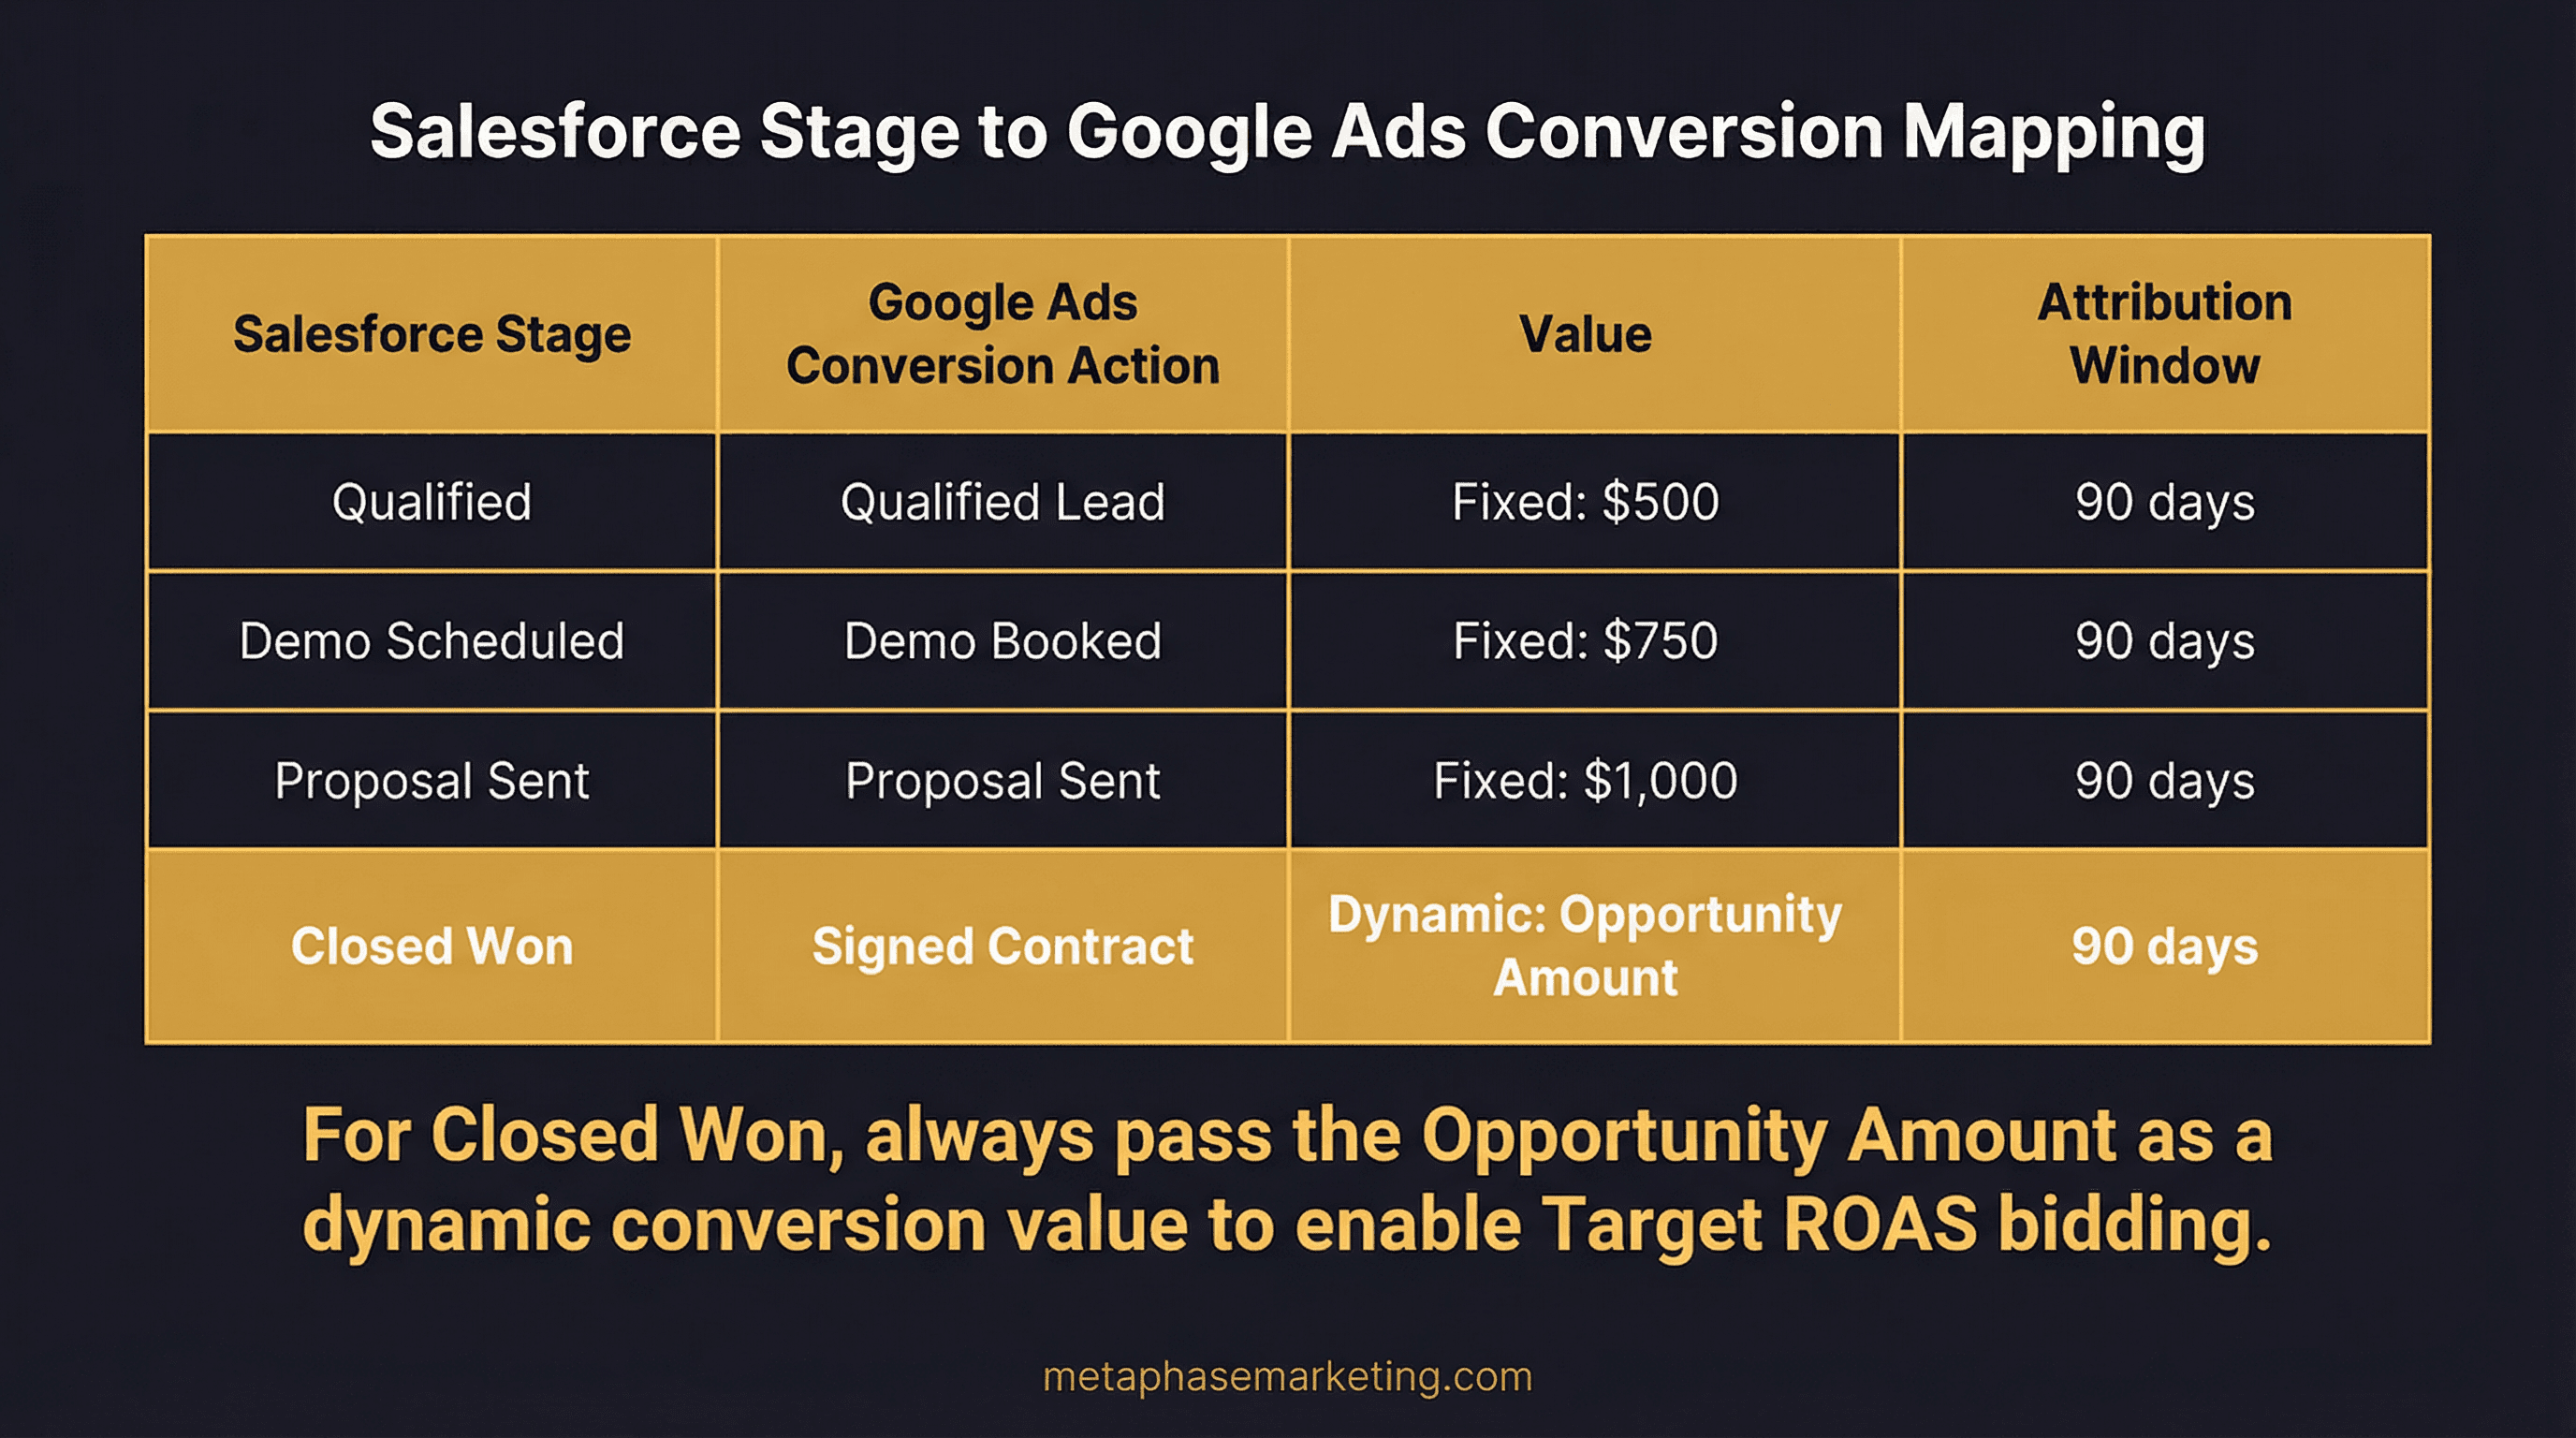
Step 9: Map Salesforce Stages to Google Ads Conversion Actions

In the Data Manager or via the legacy Tools → Linked Accounts → Salesforce path, map each meaningful Opportunity stage to a Google Ads conversion action:

Salesforce Stage

Google Ads Conversion Action

Value

Qualified

"Qualified Lead"

Fixed: $500

Demo Scheduled

"Demo Booked"

Fixed: $750

Proposal Sent

"Proposal Sent"

Fixed: $1,000

Closed Won

"Signed Contract"

Dynamic: Opportunity Amount

For Closed Won, always pass the Opportunity Amount as a dynamic conversion value. This is the signal that enables Target ROAS bidding , the algorithm can then optimize for deals that match your best-fit revenue range, not just any deal.

Method B: Google Ads API for High-Volume Accounts

If you need real-time imports, custom logic around which conversions to import, or more data control than the native integration provides, use the Google Ads API directly. This is the approach Metaphase uses for enterprise healthcare accounts and high-volume B2B clients:

from google.ads.googleads.client import GoogleAdsClient

def upload_offline_conversion(
    customer_id: str,
    conversion_action_id: str,
    gclid: str,
    conversion_value: float,
    conversion_time: str  # ISO format: "2025-03-23T14:30:00+00:00"
):
    client = GoogleAdsClient.load_from_dict({
        "developer_token": DEVELOPER_TOKEN,
        "client_id": CLIENT_ID,
        "client_secret": CLIENT_SECRET,
        "refresh_token": REFRESH_TOKEN,
        "login_customer_id": MCC_CUSTOMER_ID
    })

    service = client.get_service("ConversionUploadService")
    conversion = client.get_type("ClickConversion")

    conversion.gclid = gclid
    conversion.conversion_action = (
        f"customers/{customer_id}/conversionActions/{conversion_action_id}"
    )
    conversion.conversion_date_time = conversion_time
    conversion.conversion_value = conversion_value
    conversion.currency_code = "USD"

    request = client.get_type("UploadClickConversionsRequest")
    request.customer_id = customer_id
    request.conversions.append(conversion)
    request.partial_failure = True

    response = service.upload_click_conversions(request=request)
    return response

Wire this function to a Salesforce outbound message or platform event that fires when an Opportunity stage changes. For real-time imports, a Salesforce Flow can trigger an outbound callout to a middleware endpoint (a simple Flask or Express server) that calls upload_offline_conversion immediately.

Monitoring: Match Rate and CLICK_NOT_FOUND

After your first imports, check Google Ads → Tools → Conversions → your conversion action → Diagnostics for match rate and error details.

A match rate above 70% is healthy. Below 50% indicates a systematic GCLID capture problem , likely that the JavaScript is not running on all pages, or that some form paths do not include the hidden field.

CLICK_NOT_FOUND errors are normal and expected. This error appears when a GCLID in your import does not correspond to a Google Ads click , which will happen for any Opportunity that originated from organic search, direct traffic, LinkedIn, or other non-Google sources. Upload all of your CRM conversions regardless. Google will match what it can and ignore the rest. Never filter your uploads to only include records you believe came from Google Ads , this skews the data.

Legacy Integration vs. Data Manager in 2025

The legacy Salesforce integration (via Tools → Linked Accounts → Salesforce) is still functional but represents an older approach. Google's Data Manager is the current recommended path for new setups , it supports Enhanced Conversions for Leads, handles GCLID + hashed identity matching, and has a better UI for managing the connection.

If you are on the legacy integration and it is working, there is no urgent need to migrate. If you are setting up a new account, start with Data Manager.

Attribution Window: Matching Your Sales Cycle

When creating your conversion actions, set the attribution window to match your actual sales cycle. The default is 30 days , fine for fast-close businesses, but wrong for enterprise B2B sales that close in 90 days or more.

  • Fast-close businesses (healthcare, home services, retail): 7–30 days.

  • Mid-market B2B: 60–90 days.

  • Enterprise B2B: 90 days (the maximum). For deals that close beyond 90 days, use an earlier-stage conversion event (MQL or demo booked) that falls within the window.

If your attribution window does not match your sales cycle, you will consistently undercount conversions and misattribute them, which causes Smart Bidding to optimize for the wrong signals.

Running Salesforce and Google Ads Together?

Metaphase builds Salesforce attribution infrastructure that closes the loop between your Google campaigns and actual closed revenue. We connect the GCLID capture, the field setup, the stage mapping, and the import pipeline , so Smart Bidding is optimizing for deals, not just form fills.

See our Salesforce capabilities →

See our Google Ads approach →

Book a consultation

Available

Metaphase Marketing

Working Hours ( CST )

8am to 8pm

Available

Metaphase Marketing

Working Hours ( CST )

8am to 8pm

👇 Have a question? Ask below 👇

👇 Have a question? Ask below 👇

METAPHASE MARKETING

X Logo
Instagram Logo
Linkedin Logo

Let’s work together

© 2024 Metaphase Marketing. All rights reserved.

METAPHASE MARKETING


X Logo
Instagram Logo
Linkedin Logo

Let’s work together

© 2024 Metaphase Marketing. All rights reserved.

METAPHASE MARKETING

X Logo
Instagram Logo
Linkedin Logo

Let’s work together

© 2024 Metaphase Marketing. All rights reserved.