
Metaphase Marketing
Google Ads, HubSpot, Offline Conversions, Lead Generation, CRM Integration
HubSpot to Google Ads Offline Conversion Tracking: Step-by-Step

Cost per lead is one of the most widely reported metrics in Google Ads , and one of the most misleading. A campaign that generates 200 leads per month at $15 each looks excellent in the dashboard. But if the sales team closes 4% of them at an average deal size of $3,000, that math only works if the 4% are the leads Google Ads is being optimized for.
In most accounts, they are not. Google Ads optimizes for what it can see. And what it can see is the form submission , the moment the lead filled out a field on your landing page and hit submit. What happened after that, the qualification call, the demo, the proposal, the signed contract, is invisible to the algorithm. So the algorithm gets better and better at finding people who fill out forms. Not people who buy.
The fix is connecting HubSpot to Google Ads for offline conversion tracking. When a lead in your CRM hits a meaningful pipeline stage , Marketing Qualified Lead, Sales Qualified Lead, Closed Won , that event gets imported back into Google Ads tied to the original ad click. The algorithm now knows which specific keywords, audiences, and creatives produce real revenue, not just form submissions.
This guide walks through the complete setup, from enabling auto-tagging to automating conversion imports via webhook, including both the native HubSpot integration and the API-based custom approach.
Key Takeaways
Optimizing Google Ads for form fills trains the algorithm to find form-fillers, not buyers. Offline conversion tracking fixes this by importing real pipeline events back to the platform.
The GCLID (Google Click Identifier) is the thread that connects a HubSpot contact to the original Google Ads click. It must be captured on landing and stored against every CRM contact record.
HubSpot offers a native Google Ads integration that works for many use cases. For more control, a custom webhook pipeline gives you flexibility over which CRM stages trigger which conversion actions at what values.
GCLIDs expire after 90 days. For B2B businesses with long sales cycles, you need a strategy for deals that close after the expiry window.
Expect 10–25% CPL improvement within 60 days once meaningful offline data is flowing.
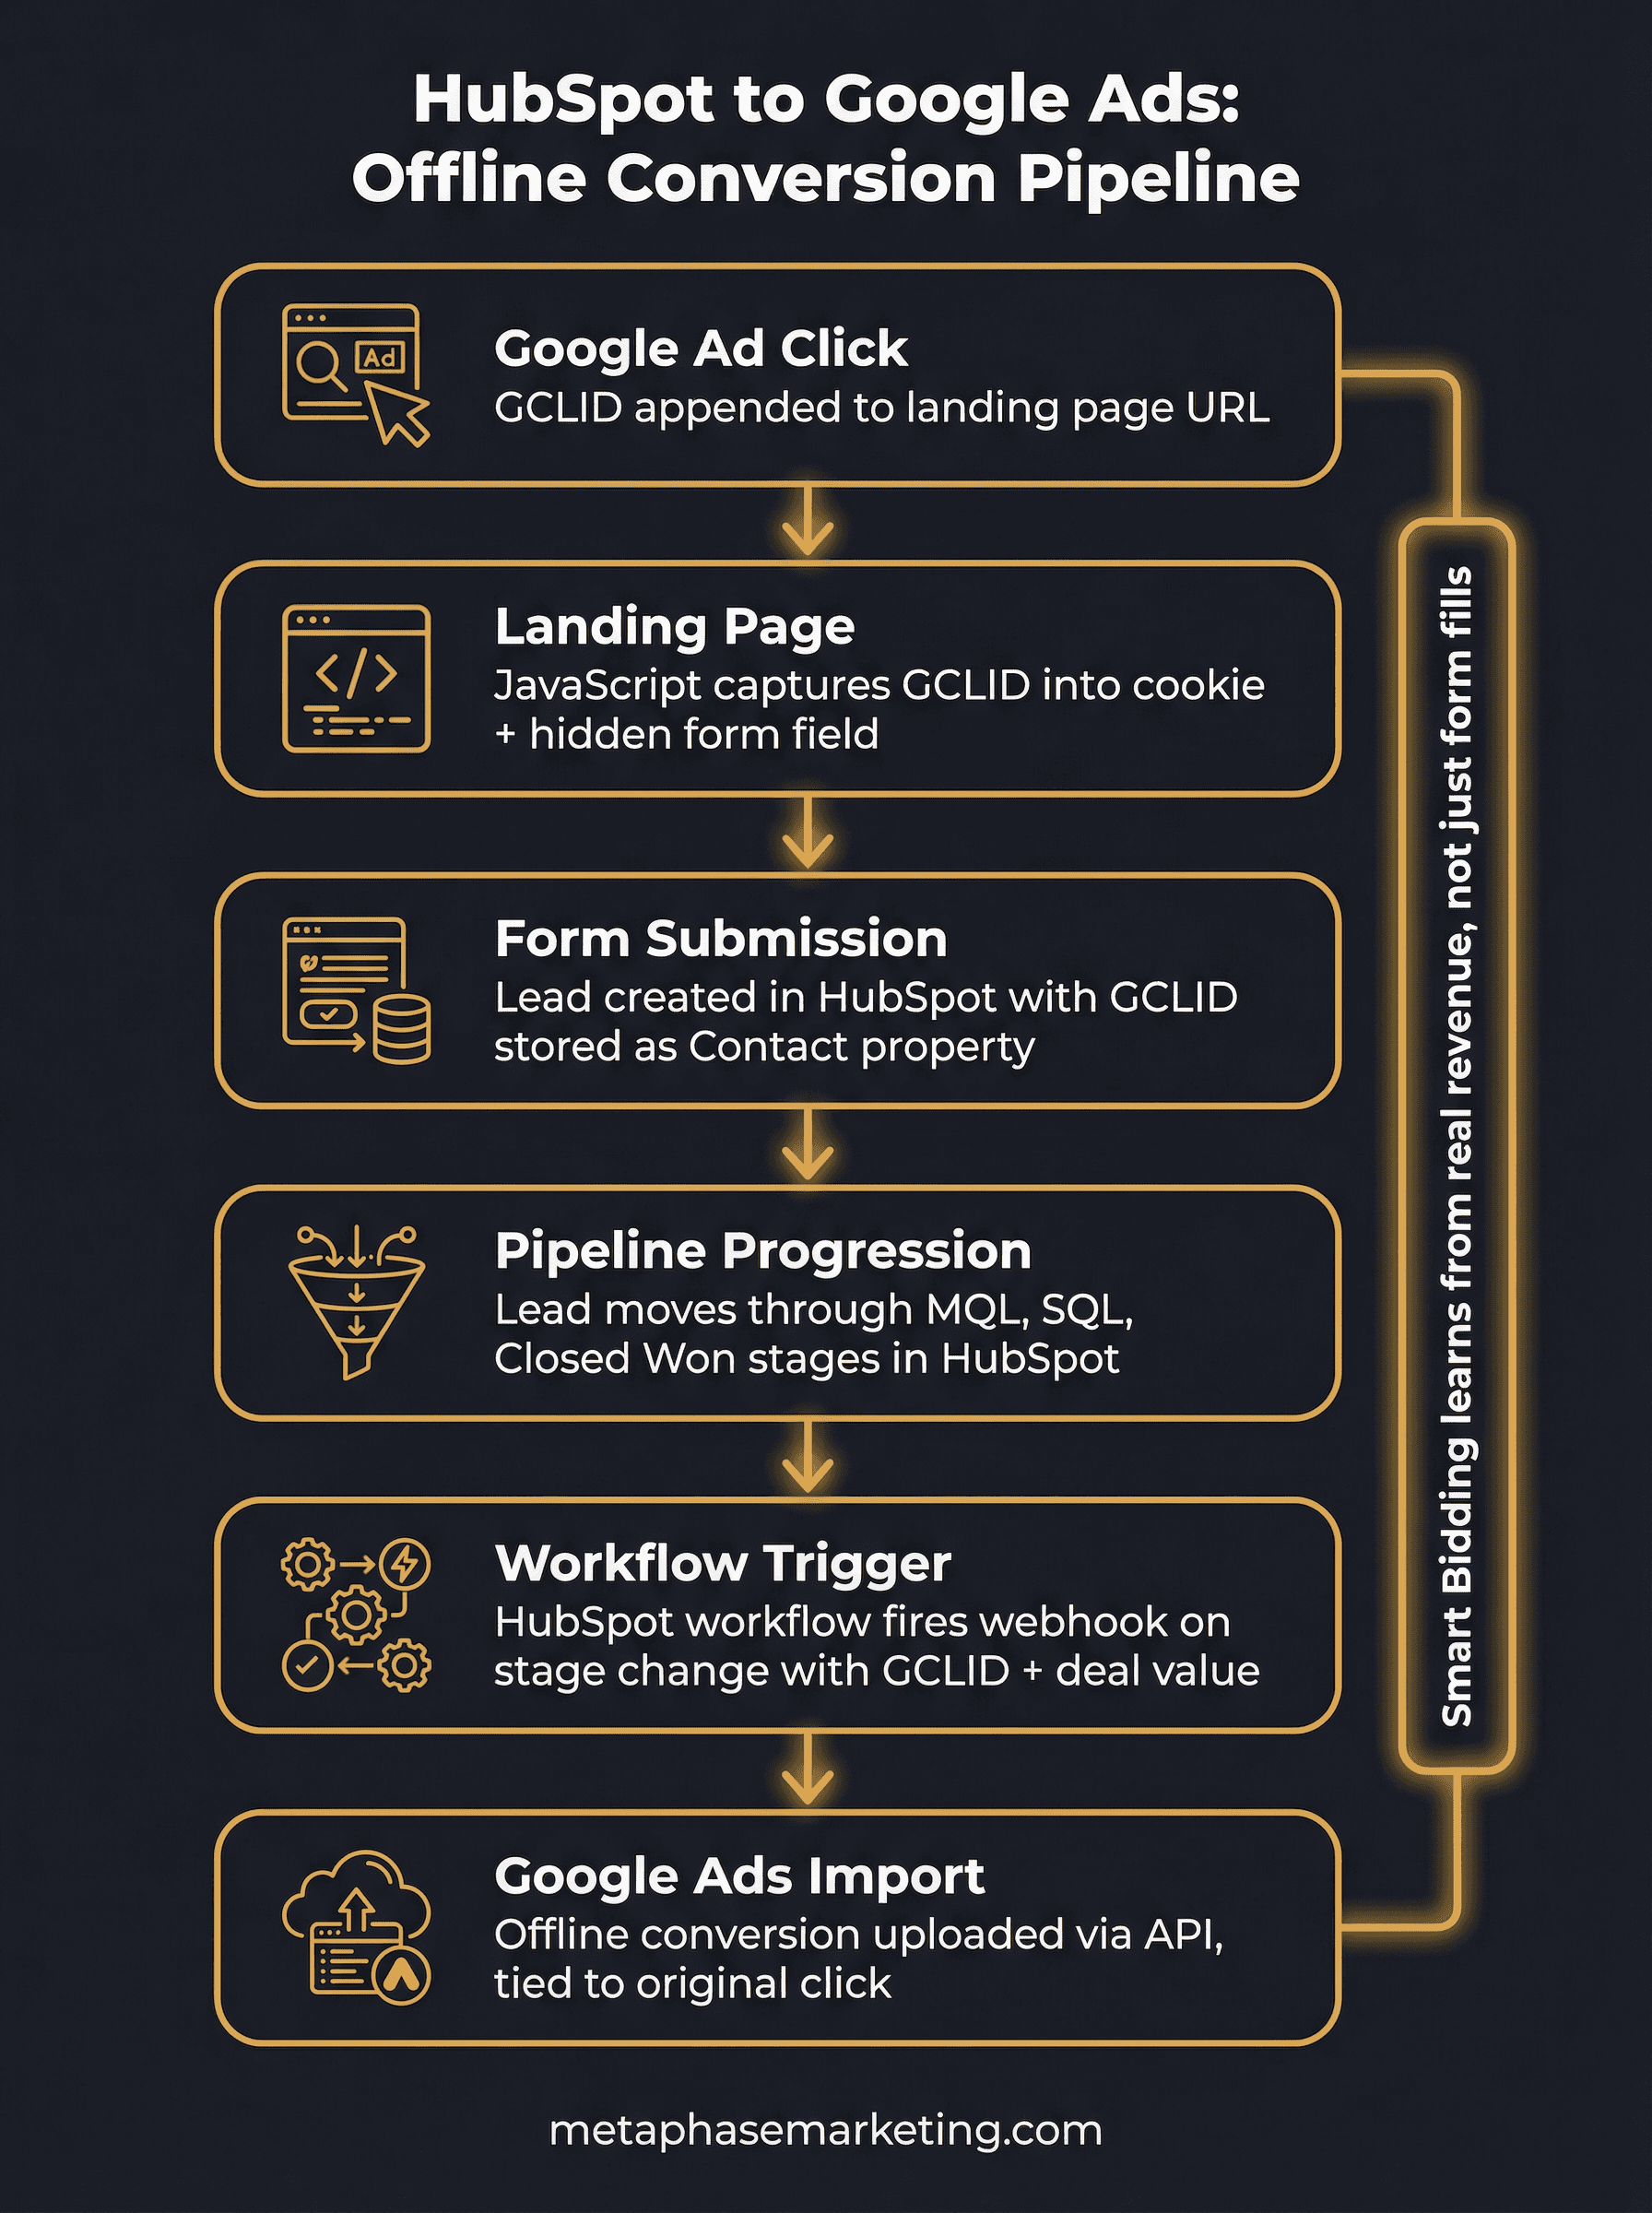
The HubSpot → Google Ads Attribution Pipeline
Before getting into individual steps, here is the full picture of how data flows through this system:
Someone clicks your Google Ad. A GCLID is appended to the landing page URL.
JavaScript on your landing page reads the GCLID and stores it in a cookie and a hidden form field.
The prospect submits your lead form. The form data , including the GCLID , goes to your server and into HubSpot as a new Contact.
The GCLID is stored as a property on the HubSpot Contact (and later, the associated Deal).
The lead moves through your HubSpot pipeline. When they hit a qualifying stage (MQL, SQL, Closed Won), an automated workflow triggers a conversion import back to Google Ads.
Google Ads receives the conversion with the original GCLID. Smart Bidding now knows this click led to a real outcome.
Every step is load-bearing. If the GCLID is not captured on the landing page, the whole chain breaks. If it is not stored on the HubSpot Contact, the workflow cannot access it. If the workflow is not configured correctly, the conversion never imports. Let us walk through each step.
Step 1: Enable Auto-Tagging in Google Ads
GCLIDs only appear in your URLs if auto-tagging is enabled. Navigate to Google Ads → Settings → Account Settings and confirm that auto-tagging is checked. If it is not, enable it now. Every ad click going forward will include a GCLID in the destination URL.
Step 2: Capture the GCLID on Your Landing Page
Add this JavaScript to every landing page. It reads the GCLID from the URL parameters when a visitor arrives and stores it both in a browser cookie (for returning visitors) and in any hidden form fields on the page:
The cookie expiry of 90 days is intentional. Google's attribution window goes up to 90 days, so a lead who clicked your ad 60 days ago and converts today still needs a valid GCLID in the cookie to be attributed correctly.
Step 3: Add a Hidden GCLID Field to Your HubSpot Forms
In HubSpot's form editor, add a hidden field to every form that should be tracked. Name the field gclid (this will map to the HubSpot property you create in the next step).
If you are using a custom form outside of HubSpot's native form builder, add this HTML field and populate it from the cookie on page load:
Step 4: Map the GCLID to a HubSpot Contact Property
Create a custom Contact property in HubSpot to store the GCLID:
Go to HubSpot → Settings → Properties → Contact Properties → Create property.
Label: "Google Click ID" (or similar).
Internal name:
google_click_id.Field type: Single-line text.
Save.
Map your form's gclid hidden field to this property so that when a form is submitted, the GCLID is stored on the Contact record automatically. In HubSpot's native form builder, this is done in the form settings under field mapping. For custom forms integrated via the HubSpot Forms API, pass the property name in your payload.
If you are tracking deal-stage conversions (which you should be), also create the same property on the Deal object and create a workflow to copy it from the Contact when a Deal is created.
Step 5: Create a Google Ads Conversion Action
In Google Ads, create the conversion action that HubSpot will import into:
Go to Google Ads → Tools → Conversions → New Conversion Action.
Select Import → CRMs, files, or other data sources → Track conversions from clicks.
Name it to match the HubSpot pipeline stage (e.g., "Marketing Qualified Lead," "Booked Call," "Closed Won").
Set Value to either a fixed estimate per stage or import dynamically from HubSpot deal amounts.
Set Count to "One."
Set Attribution model to Data-driven if eligible.
Note the exact conversion action name , you will need it in your webhook or HubSpot workflow configuration.
Step 6, Option A: Use the Native HubSpot Google Ads Integration
For straightforward use cases, HubSpot's built-in Google Ads integration handles GCLID capture and import automatically:
In HubSpot, go to Settings → Marketing → Ad Tracking.
Connect your Google Ads account via OAuth.
Under "Ads tracking," enable contact and company ad attribution.
In the Revenue Attribution settings, define which lifecycle stage or deal stage triggers a conversion import and which Google Ads conversion action it maps to.
HubSpot automatically reads the GCLID from the hs_google_click_id property on the Contact (which HubSpot populates automatically when ad tracking is enabled and the user arrived from a Google Ad). When the Contact reaches the defined stage, HubSpot imports the conversion.
Limitations of the native integration: It works at the Contact level, not the Deal level. It does not support dynamic conversion values from Deal amounts out of the box. If you need deal-stage granularity or dynamic revenue values, Option B gives you full control.
Step 6, Option B: Custom Webhook → Google Ads API
For more control over which stages trigger which conversion actions and at what values, build a HubSpot workflow that fires a webhook to a custom endpoint, which then uploads the conversion via the Google Ads API:
HubSpot workflow:
Create a Deal-based workflow (not Contact-based, so you have access to deal properties and amounts).
Set the enrollment trigger to "Deal Stage is Closed Won" (or whichever stage matters).
Add action: Send a webhook to your endpoint URL.
Include the following deal properties in the webhook payload:
gclid,email,deal_amount,close_date.
Webhook endpoint (Python):
This approach lets you pass the actual deal amount as the conversion value, giving Google Ads real revenue data instead of a flat estimate per lead. Target ROAS bidding becomes dramatically more accurate when it is working with real dollar amounts per conversion.
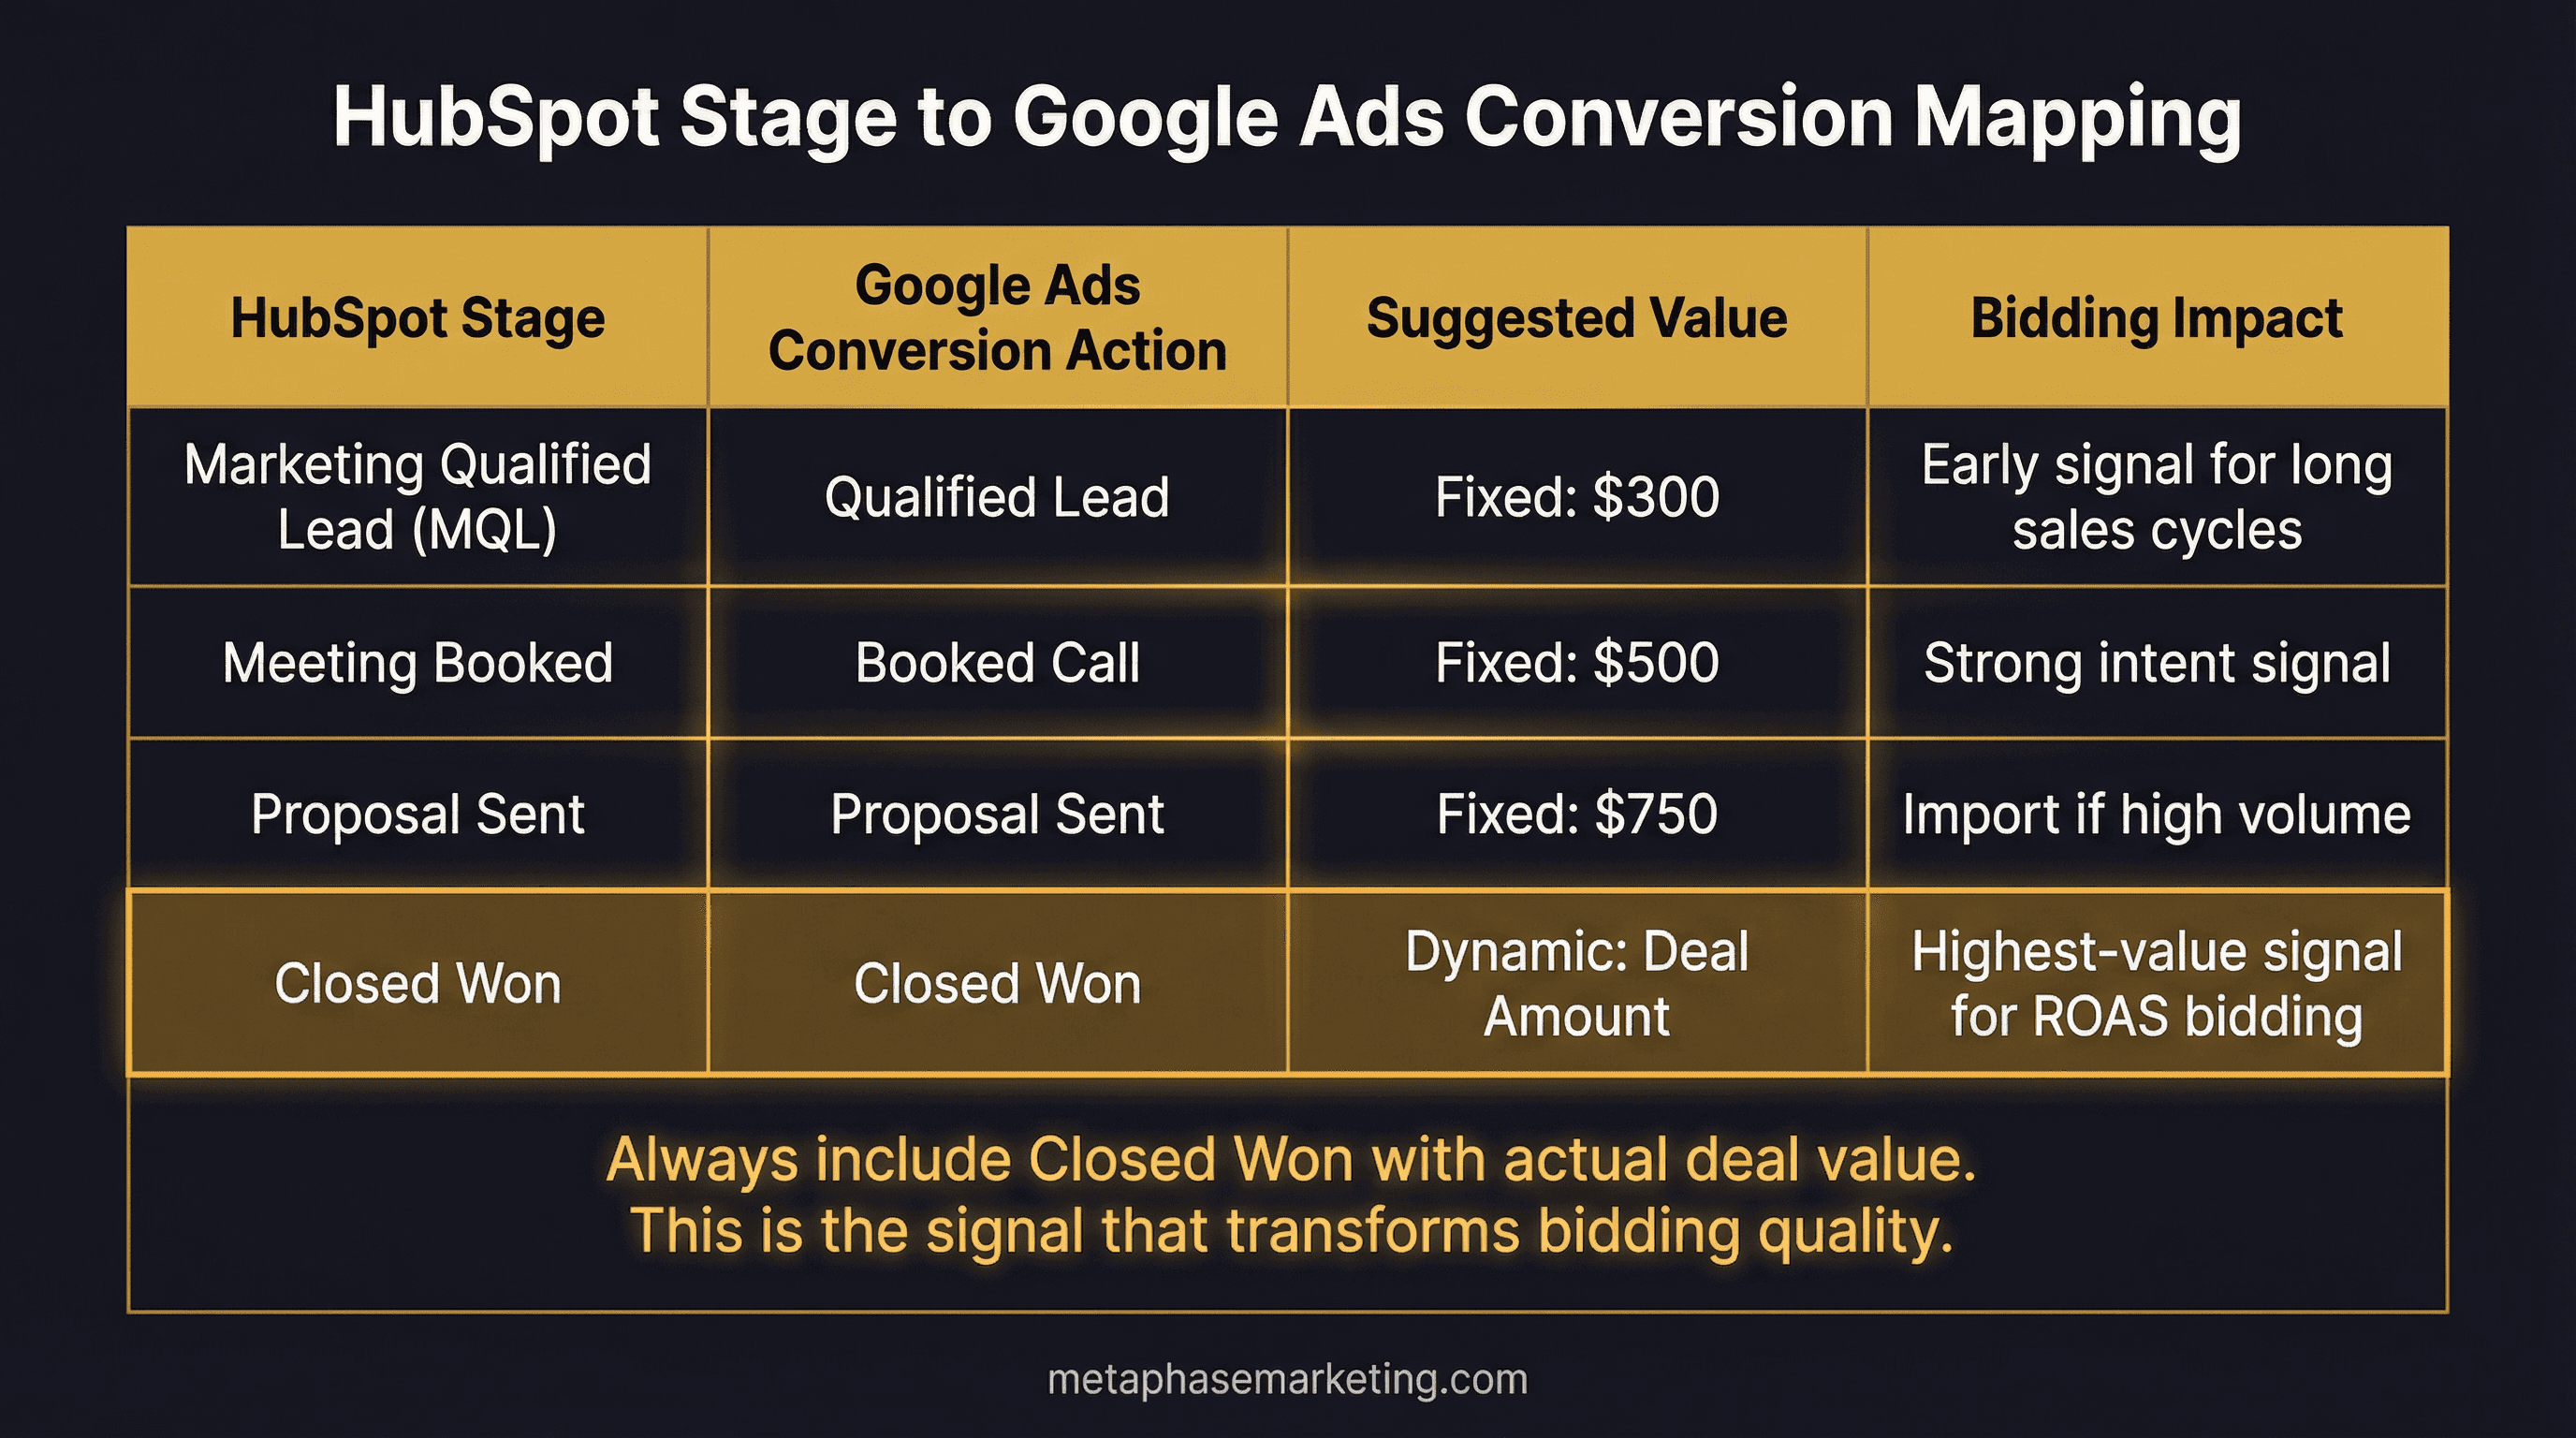
Conversion Event Mapping
You do not need to import every pipeline stage as a conversion. Import the stages that best represent real business value. A typical B2B mapping looks like this:
HubSpot Stage | Google Ads Conversion Action | Value |
|---|---|---|
Marketing Qualified Lead (MQL) | "Qualified Lead" | Fixed: $300 |
Meeting Booked | "Booked Call" | Fixed: $500 |
Proposal Sent | Import if high-volume only | Fixed: $750 |
Closed Won | "Closed Won" | Dynamic: deal amount |
Import more stages if your sales cycle is long and you want the algorithm to optimize earlier in the funnel. But always include Closed Won with the actual deal value , that is the signal that transforms bidding quality.
The GCLID 90-Day Expiry Problem
GCLIDs have a 90-day attribution window. If your typical B2B deal closes in 120 days, a significant portion of your Closed Won conversions will not have a valid GCLID to import.
Strategies for handling this:
Import earlier-stage conversions: Import MQL or Booked Meeting events, which typically happen within the 90-day window even for long-cycle deals. These give the algorithm a usable signal even if the final close is outside the window.
Enhanced Conversions for Leads: Enable this in Google Ads and send hashed email and phone data. Google uses probabilistic matching to attribute conversions even without a valid GCLID, recovering some of the conversions that would otherwise be lost.
CRM data for audience building: Upload your Closed Won contact list as a customer match audience in Google Ads. This helps the algorithm understand what buyers look like even if individual conversions cannot be directly attributed.
Troubleshooting
GCLID not being captured:
Check that auto-tagging is enabled in Google Ads account settings.
Verify the JavaScript is loading before any form submission code.
Test by clicking a live Google Ad and checking the URL for the
gclidparameter.Check whether your landing page redirects before the JavaScript can capture the parameter , redirects can strip the GCLID.
Conversions not appearing in Google Ads:
Verify the conversion action name in your import matches exactly what appears in Google Ads (case-sensitive).
Check that the conversion time is within 90 days of the click time.
Look for "Import Failed" status vs. "Imported" in the Conversions UI.
Match rate below 30%:
Your GCLID capture is likely inconsistent , some forms or pages are not capturing it.
Enable Enhanced Conversions for Leads to recover non-GCLID conversions via hashed identity matching.
Check whether forms are embedded in iframes, which can interfere with cookie access.
Bidding Strategy Once Data Is Flowing
Once you have 30 or more offline conversions per month flowing through the pipeline, you can begin shifting to smarter bidding strategies:
Target CPA: Set to 1.2–1.5x your current offline cost per qualified lead. Let it tighten over 30 days as the algorithm calibrates.
Target ROAS: Use only when you are importing dynamic deal values (actual Closed Won amounts). Once you have consistent revenue data, this is the most powerful setting available.
Expect CPL to temporarily increase in weeks three and four as junk leads are deprioritized. This is correct behavior. By month two, CPL will stabilize lower against a significantly higher close rate, because the algorithm is buying better traffic.
Want This Set Up for Your Account?
Metaphase builds complete HubSpot-to-Google Ads attribution pipelines , from GCLID capture through automated conversion imports. Most implementations are live within five business days.


